Tutorial - Create Product with Multiple Stocks |
  
|
Tutorial - Create Product with Multiple Stocks |
|
Tutorial - Create Product with Multiple Stocks
Navigation: »No topics above this level« Tutorial - Create Product with Multiple Stocks |
|
Tutorial – create product with Multiple prices
This tutorial will help you create a product with multiple pricing structures. It is recommended that you use any links or files provided with this tutorial in order to confirm that the instruction has been followed correctly using illustrations provided.
In this tutorial we will be creating a product that uses card stock and has multiple prices attached to it. The table below shows the name of the card stocks we will be using and the prices breaks for the completed product.
Card Stock |
100 |
500 |
1000 |
Card Stock A |
1 |
0.75 |
0.55 |
Card Stock B |
1.5 |
1.25 |
1 |
Card Stock C |
2 |
1.5 |
1 |
There are 4 steps to this product.
Create a Job Service
Job Service Pricing
Associate the service and pricing to a product
Create Price Breaks
Create a Job Service
Job services are options that are associated with jobs types that are available, i.e. stapling, punching to create a job service:
1.Log in to Go ePower using your producer Log in.
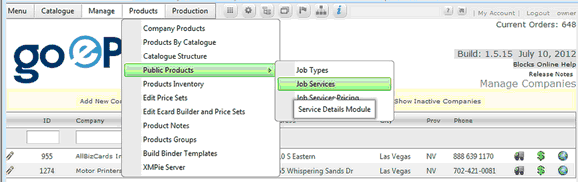
2.From the Backend Menu select Products>Public Products>Job Services.
3.Click the Add New Service link on the top left of the screen.
4.Fill in the information as follows:
a.Service: This is the name of the service, type “Choose Card Stock”
b.Service Type: Select from either a dropdown list or Option (radio buttons). This will control how the service values (details) will appear to the customer. For this tutorial you can leave the option.
c.Applies To: Pricing is applied according to this selection:
Copies: Multiply the price with the number of copies. Useful for stapling for example.
Pages: Multiply by the number of pages only. Example: Re-design work.
Total: Multiply by both the number of pages and the number of copies. Example: punching or cutting.
None: No multiplication just add the price. Example: Preparation charges
Select Copies if it is not already selected
d.Description: General description of the service type. Type “Card Stock “.
e.Click Insert to save the service.
Job Service Prices
After you have created a job Service you need to set pricing for the service.
1.To Create a Job Service Pricing select Manage Products>Public Products>Job Services Pricing.
2.Click the Add new Service Price link.
3.In the field Price Description type ” Card Stock A Price”.
4.Click the insert icon under Edit.
Add Service Price Details
To add price details:
1.Click on the expand Icon next to the Service Price you want to add details to.
2.Click the Add new Service Price Detail link.
Quantity: Enter value for the Break point using Table A in the beginning of this tutorial for example type 100
Value: Enter price of item from the table A in the beginning of this tutorial example type 1 for one dollar per piece
3.Click the insert icon to add the Service Price Detail.
4.Continue adding new Service Price Details by clicking on the add new Service Price Detail link and add all the price breaks from table A.
•Note that prices are created separately from the services, this way the same pricing can be used in more than on Service or product.
Click on the Add new Service Price and add a Price service for Card stock B and C referring to the steps for above for Card Stock A as guidance.
Now that you have created all you have created your pricing for your card stock product you can return to the Manage Job Service page and finish setting up your Card Stock A job Service. You can access the Manage Job Service page by either selecting Products>Pubic Products>Job Service or by clicking on the Job Service button on the top of the Manage Service Prices page.
On the Manage Job Service page Click on the expand icon next to Choose Card stock
Click the Add new service detail link
Fill in fields as follows:
Service option: - Enter Name for the service detail type Card Stock A
Value: Value for this option, this is hidden from the customer but will display to the producer when the job is created. For example you could put the stock number for card stock A here, type SN1000
Price Method: Select from predefined Service pricing modules. Note the drop down shows the Service prices we created earlier in this tutorial, Select Card Stock A Price.
Default: If checked, this option will be the default. Leave un checked
Setup Price: Additional price for this particular option (on top of the Service price above). Enter 0.
Click Insert to save the Service Detail
Repeat the steps above adding service details for Card Stock B and C as per Table A in the beginning of this tutorial.
Set Card Stock B as the Default service detail:
Click on the edit icon next to card stock B
Click the box next to Default so the box is checked
Click the Update button to save the change
Card Stock B is now the default price for the “Choose Card Stock” Service.
Create Static Product to use Services
1.From the Main Menu Select Products>Company Products.
2.Select the company that will own the product from the Company dropdown list
3.Click on the Add New Product link to open the product Setup window.
4.Type in the name of the product “Product with Card Stock”
5.Type a SKU (required) 0001
6.From the dropdown menu select the product type. For this exercise select static although any product type can use the services we created
7.Click the Save Button at the top of the page.
Associate Product to Product Services
In the company products page click the edit more options icon next to the product we previously created called “Product with Card Stock”
Click the Add Service link under Product services
In the option title type “Select Card stock”
In the drop down menu you will see the service we created call “Choose Card Stock” Select and click insert icon to save the change.
Click the Run Icon on the top of the page to test the product.
At this point you will note that the price displaying is 0 This is because we still have to create Price breaks as the Service prices did not have values for a quantities of 1.
Create Price breaks
On the Products Extra Options and Services page click the Price Icon on the top of the page
Click the Add New Price Break link.
Create a Price break for each of the values listed in table A and setting the Price per unit or set to 0 (the price will be calculated based on the service price for each card stock).
Run the product again.
You will now see that the quantity drop down displays the quantities and the price is calculated accordingly.