Create a Product With PDFLib Blocks |
  
|
Create a Product With PDFLib Blocks |
|
Create a product using PDFLib Block
1.Prepare the PDFLib file using the Adobe Acrobat PDFLib Plug-in and add any extra commands required by the application. Refer to “Appendix A “for instructions.
2.From the Backend Menu Select Products>Company Products.
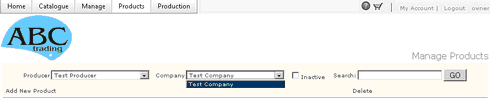
3.Select the company that will own the product from the Company dropdown list
Company dropdown
4.Click on the Add New Product link to open the product Setup window.
5.Type in the name of the product (required)
6.Type a SKU (required)
7.From the dropdown menu select the product type. select PDFLib Blocks.
8.Click the Save Button at the top of the page.
9.The Product Details form will be displayed
Product Detail form 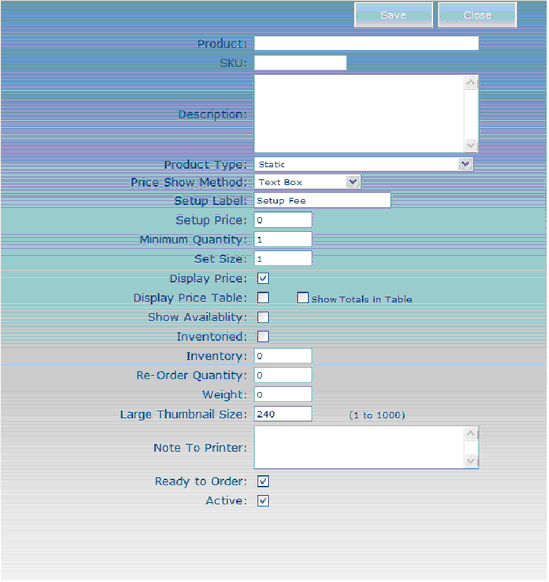
10.Fill in the product form as required (see table below for explanation of fields)
11.More options to upload files will display, these options are:
a.Block Type – Select the type:
Default – Block fields are displayed to the user each in its own page segment. Images are uploaded by the user.
Default – One Page – all blocks displayed to the user in one segment. Images are uploaded by the user.
Company Assets – Can be combined with database upload. Each Block field can be identified to get its value from an online entry or database upload. Images are selected from the Company Assets.
Personal Assets – Same as Company Assets with the exception that the images are selected from Personal Assets.
Database Upload – All block fields get their values from the uploaded database file
Address Book
I.Single Entry from Company, Personal or Both – Fields are selected the address book.
II.Multiple Entries from Company, Personal or Both – Fields are selected from the address book.
b.Block File – Select the pre-prepared PDF block file and upload it here. The system will parse it and save the block information. The file is usually in lo-res and/or contains a watermark.
c.Print Template – Select the pre-prepared PDF block file and upload it here. This file is to be used for actual printing. If no other file is uploaded here then the Block file will be used for preview and print, when using PDF blocks to print on schells you will want to upload a image of the schell so the user will see the final product displayed.
d.Product Image – The application will automatically generate thumbnails from the PDF file, this option is used to overwrite the thumbnails created by the application.
e.Input Structure – Upload a database file (Excel, Access or CSV/TAB) containing the structure required if the product uses a database as input.
f.Preview File – Downloads a sample PDF
g.Downloadable File – Allows use to Download files that may contain instructions or other information that pertains to the order.
h.Allow Downloading output –
i.Price show Method - The method selected to display quantity and price, it can be one of the following:
i.Text Box (Default) – User enters a number for quantity
ii.Dropdown List – User selects from predefined quantities
iii.Radio Button List – User selects from predefined quantities
j.Setup Label - Label for setup fee (Default: Setup Fee)
k.Setup Price - Setup or handling fee
l.Minimum quantity - Minimum Order Quantity Set Size - Prevents users from entering obscure numbers for quantities. For example, for a business card set this value to 250, users then can only select multiple of 250. (Default: 1)
m.Display Price - Display Product price, if unchecked price of the product will not display.
n.Display Price Table - Display All prices for the product in a table form
o.Show Availability - Show available inventory
p.Inventory – If Checked system will keep track of inventory
q.Re-Order Quantity - When this quantity is reached, an email notification is sent to producer
r.Weight - Weight of products, to be used for shipping
s.Package type - Large Thumbnail Size - Maximum size of the large thumbnail of a product in pixels (Default : Company settings, usually starts with 240)
t.Product Style
u.Note To Printer -- Note displayed to the printer in Job details when processing the Product
v.Ready to order - This product can be ordered only if this option is checked. This is usually used to prevent users from ordering if the product requires changes or if it is not ready yet.
w.Active - Deactivate products using this option
12. Click the Update button to save and upload the files.
13.Check if there are any error messages. When a block file is uploaded, the application checks if the fonts are already in the system, if not then an error message displays
14.All Blocks can be checked by clicking the Blocks Setup. Icon to the right of the product. Click on the Blocks Icon.
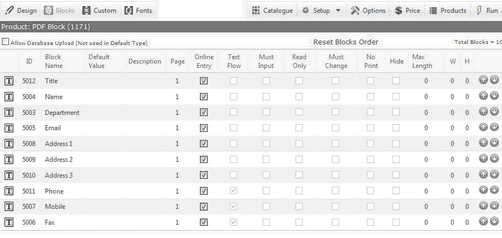
Icon |
indicates if the block is a text or image block |
ID |
ID number of the block |
Block Name |
name of the block as indicated in the structure |
Default Value |
|
Description |
|
Page |
Number of pages |
Online Entry |
Check if allows Online entry |
Test flow |
Reads from commands in PDF can be updated in Custom |
Must input |
Reads from commands in PDF can be updated in Custom |
Read Only |
Reads from commands in PDF can be updated in Custom |
Must Change |
Reads from commands in PDF can be updated in Custom |
No Print |
Reads from commands in PDF can be updated in Custom |
Hide |
Checked if field is hidden |
Max Length |
Maximum Characters in the field |
W |
Reads from commands in PDF can be updated in Custom |
H |
Reads from commands in PDF can be updated in Custom |
|
Moves field up or down in the list |
Customize
The commands can also be previewed and edited using the Custom Fields button. The application can only recognize the first 5 commands per block.
Note customizing fields does not overwrite commands in the PDF
To customize fields
1.Click the customized button on the top left of the Blocks page.
2.Click the Edit Icon next to the field you want to customize.
3.Select he command you want to add or remove from the drop down menu
4.Click Update to activate the new commands.
Design
The Design page allows Producers to further customize the output and appearance of the Blocks product.
1.Click the design button on the top left of the Blocks page.
2.Fill in the fields (see table for detail on fields)
Product Files |
|
Block File |
|
Print Template |
|
Product Layout |
|
Preview Output Type |
Choose from PDF or Image (.jpg) |
Product Image |
Large or small Thumbnail |
Use preview Rotator in External Window |
|
Mainline Field |
|
Append to Product Name |
Saves output files by Text input in the selected field |
PDF Preview Window Setup |
|
Preview Window Width |
Width of preview window in Pixels |
Preview Window Height |
Height of preview window in pixels |
Preview Options |
|
X Offset (inches) |
Allows the product to be cropped in the preview horizontally (may be used to remove crop marks in the preview) |
Y Offset (inches) |
Allows the product to be cropped in the preview vertically (may be used to remove crop marks in the preview) |
Width (inches) |
Width of the preview product |
Height (inches) |
Height of the preview product |
Custom File Permissions Options |
|
Prevent printing the file |
Stops users from printing the preview PDF |
Prevent editing or cropping pages |
Does not all user to modify PDF before ordering |
Prevent copying and extracting text or graphics |
Does not allow user to extract data from preview file |
Prevent printing in high resolution |
Only allows a low resolution copy to be printed by the user |
Print Watermark on Proof / Preview |
Proof will be produced with a watermark |
Watermark Text |
Text to display in water mark – default Sample |
3.Click Save to save your changes.
Fonts
Fonts must be in the Producers assets folder and will need to be Setup for the PDFLib product.. To upload a font in the Producers setting see Manage Producers > Manage Fonts section in Chapter 1.
To enable a font for a PDFLib Blocks product:
1.Click the Fonts button on the top left of the Blocks page. Here you will see a list of the fonts being used by the product by Block.
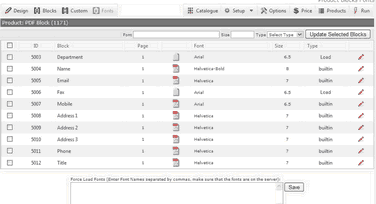
2.To Load the font, type the file name of the font in the Force Load Fonts section of the page. For example type ARIALBI.TTF if Arial is the font you are loading.
3.Click Save
4.Select the block you want to update the font for (multiple blocks can be updated at one time by checking the check boxes to the left of the Block)
5.In the Font field on the top of the page type the name of the font, Size of the font and select Type form the dropdown menu.
6.Click Update Selected Blocks.
Fonts in individual blocks can be edited by clicking on the edit icon to the right of the Block name.